Sunday 1 September 2013

Personalised pillowcase presents

Patterned, personalised pillowcases make great presents. They're useful, used everyday and everyone has a pillow to put them on. Plus they brighten up a bedroom. I've made a number now. I turned a patchwork dress into a pillowcase here and made some for Alex here.

I've made three recently. The first was for Pete's 30th;


The second and third were for Claire and Will who are off to Norway for six months. I chose some  material to remind them of London and England.

London town for Will
And English gardens for Claire
Here they are in their (almost all packed up) flat with their pillowcases.

And here they are in situ in a very plush looking Oslo apartment. Hope they're comfy!


Sunday 25 August 2013

A card box for the Bensons

Old friend Olly asked me to make a card box for his wedding. He gave me some pink and white material to use (which also topped the lovely little marmalade jar favours on the tables). I went for a postal theme with brown paper base and envelopes and cards hung from a ribbon with mini clothes pegs.

It's been a while since I've done much crafting so it was good to have a reason to get back into it.


Tuesday 2 July 2013

Roses United - Best Kit challenge


Each year the Towersey Tournoi takes place in an Oxfordshire field. My brother and his mates are always involved. As far as I can tell, the whole thing is one massive in joke, with a LOT of Strongbow thrown in.  This year, Paul was determined to win 'Best Kit' for his team Roses United (formed from northern Leeds and Manchester uni friends). For this, he enlisted my sewing machine - and my help. Apparently last years winners had one shirt with the number on the front and the logo on the back - a last minute hungover ironing mishap. Stiff competition then. 

He bought a bunch of cheap shirts online. I told him to go for blue for the goalie, but he decided salmon would clash 'better' with the red stripe. We went down Brick Lane for 3 metres of slightly silky red fabric.


To fit the stripe into the seams, we had to cut open the shirts on one side, and cut into the seam on the other sleeve.

Paul made cardboard templates for the numbers while I was adding the stripes. He then cut them out of cloth and I appliqued them on to the backs.

Al got sent out for more red thread from SewAmazing on Roman Road  - sewing shops are almost worse than chippies for badly punned names.

While I was going through the final massive sewing slog (six shirts!), Paul and Al updated the logo on Photoshop and printed it onto transfer paper which Paul ironed on.
Roses United logo
Almost finished fronts
Numbered backs (looks better at this distance than close up!)
Paul bought some fake roses to pin on the front. And here's the team, ready for action;

Paul's haircut is also a tournament special..
Dream team
In action... shirts holding up...
No victory on the pitch, but the (much more coveted I'm sure) Best Kit award!

Accepting his dues..
Who needs ball skills when you can win this beauty with a sewing machine, some photoshop and an ironing board...

Towersey Best Kit trophy

Tuesday 7 May 2013

Patchwork dress for a 'P' themed Party

A 'P' themed fancy dress party seemed like a good opportunity to experiment with a dress pattern without worrying too much if it went wrong.  It was also a good way to use up a lot of odds and ends of material I had left from projects this year.

I started by making a big sheet of patchwork.

Spot the old projects...

Going to need a slightly bigger piece of patchwork.

That's better.
Dress pattern came from The Village Haberdashery - it was the Peony pattern (although I made some adjustments). Here is is in progress - that's the top half and sleeves there. Putting the sleeves in proved the trickiest part.


Finished off with a patchwork flower...


... and a belt and a couple of bangles.


I initially put in a zip, but it made the back of the neck flop outwards and wasn't really needed - so I took it out and added a seam along the back. It was my first time adding darts too, and I was actually quite pleased with the fit and shape at the end. 
That black mark is mascara on the mirror ;)
Some of the projects you can see here are the fish pillow, the swirly skirt, the first pattern skirt, the pillowcase for Izzy, the Christmas cushion, the cushion for Jo and the patchwork quilt for baby Josh.

And here it is along with a Pilot.


Other 'P'costumes included a Punk, Pokemon, Portobello mushroom, 2 Penguins, a Pixie, Peter Pan, a Passport, a Parrot, some Pollen, lots of Pirates, Monty Panesar, a Peacock, the Phantom of the Opera, a Plastic bag, the Periodic table, a Peace sign, the Pope, a Porn star, a Pharmacist and a Parisian. Some excellent costume creativity.

A Penguin, Pixie, Parrot, Parisian and Pilot watch Panesar and Plastic bag at the coconut shy.

The Periodic table


A Portobello mushroom and Panesar again..


Passport


After the party I decided I probably wasn't going to wear the dress again so I made it into a pillowcase. I like how it is still sort of shaped like a dress.

Pillowcase still begins with P :)


Monday 22 April 2013

Making felt toys with Feltmistress

For a long time, Al and I have admired the wonderful felt characters Feltmistress creates through Instagram and Twitter. So when we saw she was running a toy making workshop at Somerset House Pick Me Up exhibition - and that it was the day after the marathon when I had a day off - we had to go.
Groam (right!)

We met two of her felt gurus G'goob and Groam - whom we'd previously admired from afar.

G'goob


Then we started trying to make our own.

There were lots of templates and suggested features - or we could try making our own. Still high on the marathon, I decided mine was going to be some kind of bemedalled superhero...


Feltmistress showed us how to add the eyes and we started sewing our toys features on to their bodies.

You'll have someones eye out with that ;)


We'd arrived early but while we were working the workshop got incredibly busy, with some amazing creations going on..


Here's our two. We couldn't stay to finish them but they're ready to be sewn together and stuffed back home.

Just love the expression on Alex's (left). Mine just looks insanely happy to have got a medal!
Later that evening I finished them off..


And photographed them next to my own felt creations - a robot and blackbird cushion for Al's worrisome warrior... 


..and the Elmer cushions for my toothy medal winner...


And here they are enjoying the sun together. Awww.


Sunday 14 April 2013

A border collie and a bicycle


Al turned 30 today and I made him a few homemade things to go with the money I was giving him towards a bicycle frame making course in the summer.

Here's a present from Watson - I found a black border collie model and painted him Watson colours with acrylic paints. I made his favourite toys - a ball and a milk carton - out of Fimo and found a suitable stick in the garden. The grass and bush are modelling greenery from 4D model shop.

Watson and all his favourite toys

I also made him a bicycle birthday card with pastels (it's been a while since I used them!);

Turns out bicycles are not that easy to draw with pastels!


Wednesday 27 February 2013

A pillowcase under the sea

It's been a while since I've had my sewing machine out. I blame the small but very sweet ball of fluff pictured below who has recently come to live with us. He's taking up a lot of my time at the moment! However, before he arrived, I had chance to make a quick pillowcase for Alex as a simple Valentines present. I found the fabric in the fabric shop Beyond Fabrics on Columbia Road ages ago and it reminded me of a silly fish based song Alex often sings when feeling cheery...


After the complexities of following a pattern in my previous skirt project, pillowcases are deliciously simple. They don't even need a zip, just one side of the case folded over and sewn inside.


Hopefully I'll be able to get my sewing machine out again soon - when this little one  has got more settled in...


Sunday 20 January 2013

A colourful skirt made using a pattern

Since receiving my sewing machine for Christmas 2011, I have been experimenting with all sorts of projects. I've made embroidered cards, laptop cases, ipad casesbunting, endless cushions, a printer cover and a baby patchwork quilt. I also signed up for a workshop where I made a skirt using DIY Couture's no-pattern technique. But I've always been a little scared of dress patterns.

However, this Christmas I received a book on Dressmaking from Al and, in thanks for making their daughter a pillowcase, a voucher for the Village Haberdashery from some friends. Both of which led me to make the resolution that if I could become confident using a machine for all sorts of projects in 2012, I could learn how to use patterns in 2013.

So I started with a simple skirt pattern from the Village Haberdashery. It promised to be a simply explained pattern for beginners. It arrived, in the Haberdashery's lovely spotty packaging, along with the material I had chosen.

Brightly coloured material!
On the back of the pattern it tells you what else you need to make up the skirt. In this case it told me I needed fusible interfacing. A look in my dressmaking book told me that this was some iron on material, that could be woven or synthetic, that you used to add structure to parts of the garment - in my case the waistband. You could also get non fusible interfacing which was sew in - but I went for the iron on one from Our Patterned Hand on Broadway Market. In fact Alex popped in to get it for me, thanks very much to the lady in there who helpfully responded to his enquiries and made suggestions.

The next thing to do is to decide what size you want the skirt - the pattern gives you cutting options for sizes 8-16. It also tells you what the measurements are in inches for each of these sizes. On doing a bit of measuring, it turned out that, for this pattern, I was size 11. Pah. This often happens in shops too. Luckily, being a pattern, I was able to make this work by cutting between the lines for the sizes 10 and 12. This was something that the dressmaking book also told me was possible. That was the limits of the pattern adjustments I made - although really, when you are more confident, the sky is the limit for adjustment and personalisation.

The next step was cutting out the flimsy tissue paper outline of the pieces I needed for my skirt and pinning these pieces to the material.

My material had what is called a nap (another thing I learned from my dressmaking book). This basically means that there is something about the material which meant that it had a definite top and bottom. In my case it was due to the one way design of the pattern - I had peacocks whom I wanted to be the right way up all the way round. In some cases the nap can be caused by the pile of the material.

This meant that I had to fold the material lengthways and put the pieces one above the other. If I had been using plain fabric, I could have folded the material as it arrived, in more of a square.

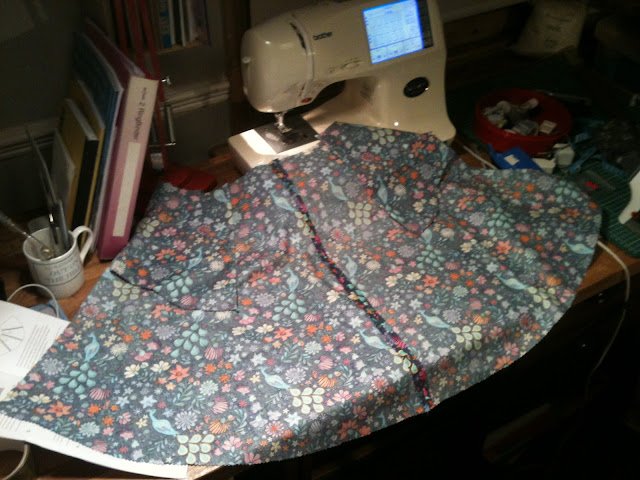
Each piece of the pattern had lines on that told me where to cut and which way up it should go - and black triangles along the edges which pointed to where a seam started. As recommended in my book, I marked these when cutting out by snipping a little triangle tab that poked out from the material where the black triangle poked in. The pieces also told me how many of each piece I needed - two of everything except the waistband. The waistband only needed one piece, but also needed a similar piece cut out of the interfacing. After cutting out, the next stage was to sew the pockets to the front pieces and sew these together - as seen in this slightly blurry picture here;


After this, I added the back pieces in the same way which made a semi circle of skirt. This was the stage where I went slightly off pattern. Although promising myself that the best way to learn was to follow it exactly, I decided I really wanted a lining. Much of the material you can buy is reasonably thin cotton - and can be pretty see through in certain lights. This is ok if you are always going to be wearing leggings, but not so good if you want to wear it with bare legs in summer too.

I had some pink material left over from making table runners for two friends' wedding. It was pretty thin stuff, but good enough for a lining. I pinned the skirt to the material to cut around it.

At this point, I also decided that I wanted to shorten the length. At the moment it seemed to sit at an awkward, just past the knee length - and I prefer them shorter or full length. So I decided to cut out the lining and the pattern together and shorter.

I marked the length I wanted it all the way round with tailors chalk by measuring the distance from the waistband at regular frequencies and then joining the marks I made together.  I then cut it out with pinking shears.

After this came the initially complicated step of adding the waistband. I studied the instructions that came with the pattern for a long time, and came to the conclusion (as one so often does with new and confusing instructions) that they MUST have printed it wrong as it just didn't make any SENSE the way they had shown it. I sometimes get this feeling with crosswords too...

Luckily, when I next came back to the project a few days later, it made more sense and I pinned the skirt to the waistband (onto which I had ironed the fusible interfacing).

This is shown here by another speedily snapped phone picture. Initially I tried to force the straight waistband to pin around the curve of the skirt waist (as seen above) - but then I realised that there was supposed to be a more material in the skirt and pinning it straight created these folds.

Nevertheless, I had to remove a little material from each end.

After sewing the first side of the waistband in place I sewed the two sides together halfway up the back, leaving space for the zip.


I added the zip using my zip foot on my machine - of course! Once the zip is in place, as seen in the picture (almost), you sew down from the top, over the bottom, reinforcing it a few times, and up the other side.

The next step was to fold over the waistband and iron it so it created a folded bank with the interfacing in the middle and the pattern on both sides.

I then sewed round the place where the waistband meets the skirt to keep everything (including the newly added lining) in place.

Finally, the last thing to do was to hem it round the bottom. The skirt I made with DIY Couture suggested using bias binding around the base - but this pattern suggested hemming so I gave that a go this time.


I hemmed the lining and the outside of the skirt separately, pinning them first. As you can see, I did the outside hem quite a lot neater than the lining one!

And that was it done. Trying it on again (I had done this a few times throughout the process, don't worry) I found it fit excellently. Hooray for making my own size 11 clothes :)


And here's the finished skirt, hanging on my door.